|
1. Truss Rod Adjustments
 Tools needed: Allen wrench
Loosening the truss rod.
Turn the wrench counter-clockwise
only 1/4 turn.
You should be able to see a difference after a quarter turn. If not, try a little more, but I'd recommend no more than a half
a turn per day. Wooden necks require time to "settle in" to truss rod adjustments.
Tightening the truss rod.
Tightening is a little more complicated.
Before you turn the wrench, you need to "help" straighten the neck a little.
This is easiest if you're sitting down.
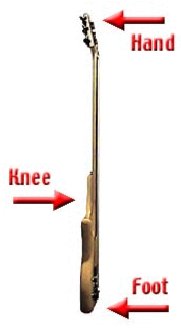
Stand the bass on the floor.
Put your foot in front of it.
Put your knee behind it.
And carefully push on the front of the headstock.
Then while you're putting pressure on the headstock, turn the wrench clockwise to tighten the truss rod.
Important.
Again, only turn the wrench clockwise 1/4 of a turn. You should be able to see a difference after a quarter turn. If not,
try a little more, but I'd still recommend no more than a half a turn per day. Wooden necks require time to "settle in" to
truss rod adjustments.
Quick Note:
Tightening the truss rod lowers the strings.
Loosening the truss rod raises the strings.
2. Saddle-Height Adjustment
 Tools needed: Small allen key, and a feeler gauge for more advanced setups
Remember: lefty-loosey, righty-tighty. Loosening the screws in the saddle will raise the saddle. Do it one at a time, keeping
the saddle level the entire time – if the saddle isn’t level, then both screws don’t have full contact with
the bridge. If the saddle doesn’t have full contact with the bridge, it will lose sustain and tone, which is a very
bad thing. Hence, always keep them level. The best way to do this, I find, is to do a quarter turn in one screw, then the
other, and repeat as needed. Don’t stress if your strings are higher off of the frets at the end of the neck than they
are at the first three frets – it’s supposed to be that way. Ideally, the height of the strings from the first
fret to the fifth fret should gradually increase, and the height from the last fret to the string should be the same as for
the fifth fret.
If the fingerboard on your bass is radiused, as the picture to the side, then you have to have the strings follow the curve
of the fingerboard. If the fingerboard is flat, then keep them all the same height.
3. Intonation Adjustments
Tools needed: Tuner, screw driver
Intonation affects how “in tune” the notes you play are. On a fretless bass, this depends on your finger placement,
but on a fretted, where the frets are in relation to the length of the string. The intonation on the first several frets will
usually be perfect, but once you get up around the 12th fret and beyond, no such luck.
On the back of the bridge, there will be a screw for each saddle. Tune your strings, and then hit the harmonic at the 12th
fret, and then hit a fretted 12th fret. If the fretted note is sharp, you’ll need to shorten the string length. If the
fretted note is flat, you’ll need to lengthen the string. This is done by turning the screw in the back of the bridge.
You’ll probably never get it absolutely, spot on perfect for both open notes and the 12th fret (unless you’re
using a fanned fret bass), but you can get it pretty close.
(Truss rod instructions and the picture are from GaryWillis.com)
|